Candle holder candelabra wedding centerpieces are among the most versatile and elegant table centerpieces in the event planning industry! The endless ways to style special events from glamorous sequins to rustic burlap have created a need for more innovative decor. That makes our modern 10 arm candelabra centerpieces perfect for today's evolving wedding styles.
Similar to our reversible riser centerpiece vases, these tall candelabras will add height and elegance to both round and rectangular event tables. As an added bonus, the warm and romantic candlelight radiating from the centerpieces will create a truly elegant atmosphere for your wedding ceremony or reception!
In today's tutorial, we will be showcasing how to assemble and style our modern 48" tall candelabra candle holders. We will provide you with step-by-step setup instructions, easy DIY decor tips, and some key points to keep in mind before and after using your centerpiece. Let's get started!

Assembling Your Tall Candelabra Centerpieces
Getting a notification that your new candle centerpiece has arrived will be just as exciting as when you finally get to place your centerpiece on top of your tables!
Please keep this in mind as you unbox the several parts it will take to build your beautiful candelabra. At first, it may look overwhelming, however, our multi-tier candle centerpieces consist of easy-to-assemble parts and instructions!
Pieces Included:
- 10 x Internal tooth lock washers
- 10 x Nuts
- 10 x Screws
- 1 x Base
- 16 x Metal Rods
- 10 x Candlestick Holder Pieces
- 10 x Hurricane Glass Cylinders
Set-Up Instructions:
Step 1:
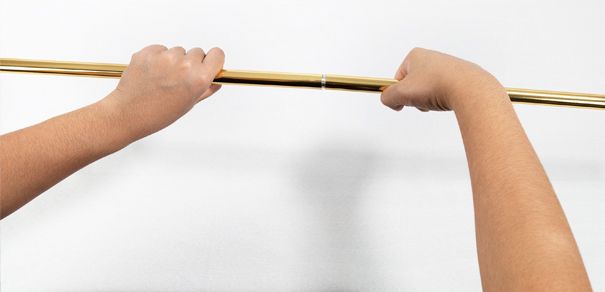
The 10 candelabra arms will consist of 4 assembled arms and 6 arms that will require assembly. The 6 arms that need to be assembled will be made from two rods that need to be screwed together, they will be packaged together.
There should be 12 rods that need to be screwed together making 6 long rods total. Once you’re done screwing all the pieces together you should have 10 total rod pieces in varying lengths. Set the arms aside for now.
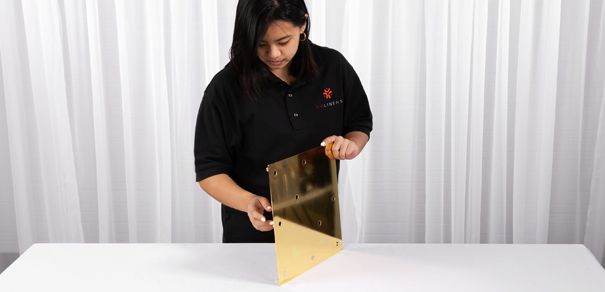
Step 2:
Take the flat base of your centerpiece and flip it on its side so you have easy access to the front and back of your base. (The back of your base has 4 round metal legs on each corner.)
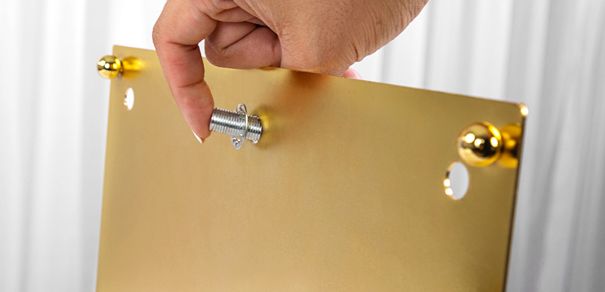
Step 3:
Place a screw through one of the holes in the base. This will be where your first rod will go. Grab an internal tooth lock washer and place it over the screw through the back of the base and follow it with one of the nuts.
Make sure that the nut is close to the edge of the screw so that the screw doesn’t stick out further than the centerpiece legs.

Step 4:
(This part is where you can get creative!) You can choose to screw the longest rod pieces in the middle of the base and stagger the rods from tallest to shortest. There are many different ways to stagger the heights of the rods to suit your preference.

Step 5:
Grab the metal rod and begin to twist it on your screw tightly while pushing the screw towards the rod from the back of your base to ensure it’s screwed on tight and secure. (Make sure the side of the rod with the ribbed ring threading is one touching the base.)

Step 6:
Repeat steps 3-5 until all of your metal rods are secured on your base. You can now stand your base up so the rods are facing you.

Step 7:
Next, grab your candlestick holder piece so that the thin tube is facing up and tightly screw the holder onto the top of your metal rods. Repeat this step for all 10 rods.

Step 8:
Your centerpiece is now assembled and ready for candles. Once your candles are added, you can finally add the hurricane glasses to finish the centerpiece. Now, the table styling and fun begins!
Candle Lit Centerpieces

When it comes to determining what candle you will use, you have the option of using any 9" or shorter dripless taper candles, standard 1” wide LED, or wax candlesticks. However, we recommend using flicker-wick LED candles to give them a long-lasting realistic flame effect as they will not leave a waxy residue to clean up.
Aside from avoiding wax cleanup, LED lights are less of a fire hazard and will also avoid any glass soot residue that real candle flames might cause.
We offer different kinds of centerpieces from acrylic centerpieces to glass ones. If you’re in the market for flower vase centerpieces, we offer them in different colors and materials just like these rose gold flower centerpieces.
Candle Centerpiece Safety Guidelines and Tips
After fully assembling your centerpiece, you are ready to move it to the designated area to create an elegant focal point. Whether you use wax or LED candles, it is best for both the candles and the hurricane glass cylinders to be removed before moving your centerpiece.
This will prevent any parts from breaking as well as preventing any injuries. However, we understand that accidents happen so if you happen to have an accident with one of the glasses, we do offer replacement glasses you can order online here!
Keeping your safety and the weight of the centerpiece in mind, we also strongly suggest that the centerpiece be moved by two or more persons. Although the weight of the centerpiece may be managed by a single person, using more than one person will make this process much safer and easier!

Modern Multi-Purpose Centerpieces
Decorating with your new candelabra for table centerpieces means you can use it anywhere. Although traditional 4 arm candelabras are usually displayed over elegant tablecloths for stunning banquet hall designs, the 48” height of this centerpiece easily allows you to create a variety of captivating focal points just about anywhere!
As all event planners know, finding event decor that is beautiful and multi-purpose is like winning the event decor lottery! These beautiful centerpieces are an economical decor choice, as they can be used time and time again! They look great on their own or can be elevated even further by adding extra styling. If you're looking for a versatile centerpiece, our modern 10 arm candle holders are just what you need!
CV Linens offers wholesale candelabras for all your event needs. Shop by color and choose from a variety of options. You can pick our elegant tablescapes from gold candelabra centerpieces, silver candelabra centerpieces, or black candelabra centerpieces, among others.
Wedding Ceremony Decor
Our glass candle holder centerpieces are perfect for adding a luxurious wow factor to your wedding ceremony and reception! Imagine walking towards the love of your life down an aisle covered in rose petals. As you glimpse at your guests, you notice that you are surrounded by romantic candle lights that reflect off the glass candelabras. Although the gaps between the arms allow a glimpse of your guests, this elegant surrounding will redirect your attention to your long-awaited destination, the end wedding altar!
When it comes to saying your I Do’s, you also want to make sure you have a picture-perfect backdrop! To enhance the exchange of your wedding vows, you can add a 48” candelabra to each side of your beautifully draped wedding arch. For added glamor and height, place them on top of flower-filled acrylic rises or your wedding aisle pillars!
Beautiful Wedding Reception Decor

Once your ceremony is over, you can easily shift the attention over to your reception tables with the same centerpieces in a more intimate setting! Whether you’re using round or rectangular tables, the illusion of floating candles from the candelabras will easily capture the attention of your guests as they enter the reception area!
To enhance the look of your tablescape, you can place your centerpieces over a table runner for a pop of color. Using a sheer material like our chiffon table runners will enhance your centerpiece without being too overpowering. This will allow you to add additional decor to the gaps between each arm without distracting from the candelabra arms. To continue the candle-lit dinner theme, add wax or LED tea lights to the base between each gap for a truly layered tablescape design.
To incorporate your wedding bouquet flowers in your reception and table centerpieces, add faux or fresh flower bundles in between the candelabras or add greenery garlands as accents through the centerpiece base. Another easy decor tip is to sprinkle rose petals on the table and centerpiece to cover the base as another way to enhance your table decor. For truly impressive decor, add both tea light and flower accents around your centerpiece!
Putting Out The Candles
After the big day is over, it's now time to store your wedding centerpieces. If you are unable to store the centerpiece fully assembled, you will need to dismantle it until your next event. As you take down the centerpiece, please be sure to use bubble wrap or newspaper when storing the glass cylinders to prevent them from breaking. Once you get to unscrewing the 2 part metal rods, it will be very useful to label and keep corresponding parts together.
You can do so by keeping both parts that will create the 28.5”, 33.5” & 38" arms in the corresponding plastic bag they arrived in, using rubber bands, or saran wrap to keep the pair of rods together in storage. As for the one-piece 19" & 23.75" poles, simply labeling their size will help you remember where they go when you set the stand up again. Proper storage will be sure to save you valuable time for your next event!
Elegant Candle Decor For Any Event
Whether your special event will take place indoors or outdoors, our modern candelabra centerpieces are a decor must! Use them to define your wedding aisle, add focus to a sweetheart table, or add a modern twist to your table decor. Your guests are sure to be blown away by this striking candelabra centerpiece that adds elegance to any event big or small!
For additional help setting up your table candelabra centerpieces, please give us a call at 512-821-1178 or email us at info@cvlinens.com. We’re always happy to help! We can’t wait to see your creativity when it comes to styling our candelabra decorations!
If you value your event decorations and order in bulk, you might want to consider joining the CV Linens Rewards program. With this, you can earn points and rewards while you purchase our quality items. Save more in the long run while you shop. Get the best value by choosing our bulk table linens for your events.
Are you a Visual Learner?
Watch our step by step video tutorial on how to easily assemble your 10 arm candelabra centerpiece!
Pin for Later